Protecting your App
When your app has successfully finished uploading, choose the protection type.
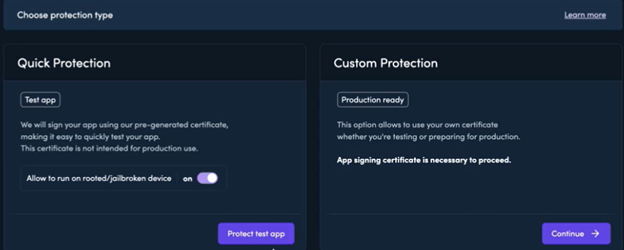
Select from:
Using Quick Protection
To protect a test app, you can select quick protection. Quick protection signs your app using a pre-generated certificate for testing only.
Quick Protection also generates a default configuration file for the protection. If you choose to, you can customize this default configuration file for adding Custom Protection to the same app in the future.
To use Quick Protection
- Toggle the rooted/jailbroken device setting. The default setting of ON allows the app to run on a rooted/jailbroken device. This toggle overrides the configuration file setting.
- Select Protect Test App.
- Wait for protection to be completed. During protection, you can choose to hide the progress window by selecting Run in Background.
- Download your protected app for testing. You do not need to sign a quick-protected app after download.
If you want to customize the configuration file for future use in Custom Protection, download it now.
NOTE DO NOT try to publish a quick-protected app because app stores such as Google Play will not recognize the certificate.
Using Custom Protection
To publish your protected app on a store such as Google Play, you must use custom protection. For custom protection you must provide the correct App Signing Key Certificate for your app. This is the public-facing equivalent to your private signing key.
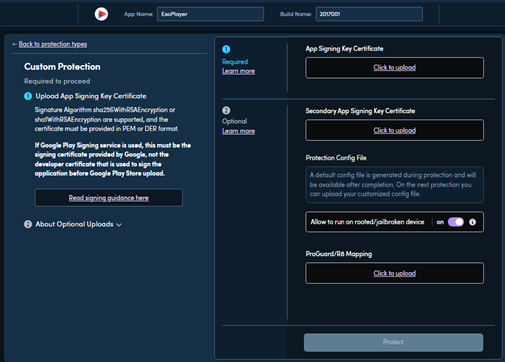
To use Custom Protection
-
Select Continue.
-
Upload the App Signing Key Certificate.
- If your app uses Google Play Signing, then you will need to provide the Google-generated App Signing Key Certificate that you can download from Google Play Console.
- If your app is a developer signed APK, you’ll need to provide the app signing key certificate that you extracted from your keystore.
For help on finding the correct App Signing Key Certificate, refer to Retrieve your App Signing Key Certificate.
For more information on why you need to provide the App Signing Key Certificate, refer to Lock the App to your Signing Key.
-
Upload any optional files:
- Secondary App Signing Key Certificate: A secondary app signing key certificate allows you to sign and test the protected app build locally.
- Protection Config File: In the Protection Config File field, you can select a custom configuration file (if you have created one) or accept the default configuration file.
If this is the first time you have protected the app then a new default configuration file is generated, otherwise the default is the same configuration file as for the previous protection. - ProGuard/R8 Mapping File: Uploading a ProGuard or R8 Mapping file makes it easier to debug protected apps.
-
Select Protect.
-
Wait for protection to be completed. During protection, you can choose to hide the progress window by selecting Run in Background.
-
Download your protected app.
If you want to customize the configuration file for future use in Custom Protection, download it now. -
You must sign your protected app before publishing it on Google Play or installing it on a device. For more information refer to Signing your Android App.
Updated 4 months ago